Victims
Victims are used to describe a specific organization or group that has been targeted or whose Assets have been exploited.
Retrieve Victims
Filtering Victims
When retrieving Victims from ThreatConnect, it is possible to filter the results on the following data points:
Filter |
Data Type |
Operator |
|---|---|---|
name |
string |
|
Hint
The “^” character means “starts with”. For example, this character would be used to find all URL Indicators that start with http://xn-- or all Groups whose name starts with APT.
Note
The =, <, >, and ^ operators in any filters must be URL encoded as follows:
Character |
URL Encoded Form |
|---|---|
= |
|
< |
|
> |
|
^ |
|
The following query will return all Victims that start with “Example” (name^Example):
GET /v2/victims/?filters=name%5EExample
The following query will return all Victims whose name is “Example Organization” (name=Example Organization):
GET /v2/victims/?filters=name%3DExample%20Organization
Retrieve Multiple Victims
To retrieve multiple Victims, use the following query:
GET /v2/victims/
JSON Response:
{
  "status": "Success",
  "data": {
    "resultCount": 2,
    "victim": [
      {
        "id": "54321",
        "name": "Burton Guster",
        "org": "",
        "suborg": "",
        "workLocation": "",
        "nationality": "",
        "webLink": "https://app.threatconnect.com/auth/victim/victim.xhtml?victim=54321"
      },
      {
        "id": "54322",
        "name": "West Coast HR Department",
        "org": "",
        "suborg": "HR Department",
        "workLocation": "California",
        "nationality": "",
        "webLink": "https://app.threatconnect.com/auth/victim/victim.xhtml?victim=54322"
      }
    ]
  }
}
Retrieve a Single Victim
To retrieve a single Victim, use a query in the following format:
GET /v2/victims/{victimId}
For example, if you want to retrieve the Victim with ID 12345, you would use the following query:
GET /v2/victims/12345
JSON Response:
{
  "status": "Success",
  "data": {
    "victim": {
      "id": "12345",
      "name": "Burton Guster",
      "description": "He also goes by 'Magic Head', 'Lavender Gooms', 'Ghee Buttersnaps', and 'Control Alt Delete' (among others).",
      "org": "Psych",
      "suborg": "Super Sniffer Department",
      "workLocation": "Santa Barbara, California",
      "nationality": "American",
      "webLink": "https://app.threatconnect.com/auth/victim/victim.xhtml?victim=12345"
    }
  }
}
Retrieve Victim Metadata
Retrieve Victim Attributes
To retrieve a Victim’s Attributes, use the following format:
GET /v2/victims/{victimId}/attributes
For example, if you want to retrieve the Attributes on the Victim with ID 12345, you would use the following query:
GET /v2/victims/12345/attributes
JSON Response:
{
  "status": "Success",
  "data": {
    "resultCount": 2,
    "attribute": [
      {
        "id": "54321",
        "type": "Description",
        "dateAdded": "2016-07-13T17:50:17",
        "lastModified": "2017-05-02T18:40:22Z",
        "displayed": true,
        "value": "Description Example"
      },
      {
        "id": "54322",
        "type": "Source",
        "dateAdded": "2016-07-13T17:51:17",
        "lastModified": "2017-05-02T18:40:22Z",
        "displayed": true,
        "value": "Source Example"
      }
    ]
  }
}
To retrieve the Security Labels that are on an Attribute, use the following format:
GET /v2/victims/{victimId}/attributes/{attributeId}/securityLabels
Here is an example query:
GET /v2/victims/12345/attributes/54321/securityLabels
JSON Response:
{
  "status": "Success",
  "data": {
    "resultCount": 1,
    "securityLabel": [
      {
        "name": "TLP:AMBER",
        "description": "This security label is used for information that requires support to be effectively acted upon, yet carries risks to privacy, reputation, or operations if shared outside of the organizations involved. Information with this label can be shared with members of an organization and its clients.",
        "dateAdded": "2017-07-13T17:50:17"
      }
    ]
  }
}
Retrieve Victim Security Labels
To retrieve the Security Labels for a Victim, use a query in the following format:
GET /v2/victims/{victimId}/securityLabels
For example, the query below will retrieve all Security Labels for the Victim with ID 12345:
GET /v2/victims/12345/securityLabels
JSON Response:
{
  "status": "Success",
  "data": {
    "resultCount": 1,
    "securityLabel": [
      {
        "name": "TLP:AMBER",
        "description": "This security label is used for information that requires support to be effectively acted upon, yet carries risks to privacy, reputation, or operations if shared outside of the organizations involved. Information with this label can be shared with members of an organization and its clients.",
        "dateAdded": "2017-07-13T17:50:17"
      }
    ]
  }
}
Retrieve Victim Associations
Group to Victim Associations
To view Groups associated with a given Victim, use a query in the following format:
GET /v2/victims/{victimId}/groups
For example, the query below will retrieve all of the Groups associated with the Victim with ID 12345:
GET /v2/victims/12345/groups
JSON Response:
{
  "status": "Success",
  "data": {
    "resultCount": 1,
    "group": [
      {
        "id": "54321",
        "name": "Associated Incident",
        "type": "Incident",
        "ownerName": "Example Organization",
        "dateAdded": "2017-07-13T17:50:17",
        "lastModified": "2017-07-13T17:51:17"
        "webLink": "https://app.threatconnect.com/auth/incident/incident.xhtml?incident=54321"
      }
    ]
  }
}
You can also find associated Groups of a given type using the following format:
GET /v2/victims/{victimId}/groups/{associatedGroupType}
Replace {associatedGroupType} with one of the following Group types:
adversariesattackPatternscampaignscoursesOfActiondocumentsemailseventsincidentsintrusionSetsmalwarereportssignaturestacticsthreatstoolsvulnerabilities
For example, you could use the following query to find all Incidents associated with the Victim with ID 12345:
GET /v2/victims/12345/groups/incidents
You can delve further by adding the ID of an associated Victim to the end of the query:
GET /v2/victims/12345/groups/incidents/54321
Where 54321 is the ID of an Incident associated with Victim 12345.
Indicator to Victim Associations
Note
It is not possible to associate an Indicator directly with a Victim in ThreatConnect. The query described in this section returns Indicators that share a Group association with the given Victim. In the image below, the Victim and Indicator are not directly associated, but are both associated with the same Group. Therefore, the Indicator would be returned when querying for Indicator associations from the Victim.

To view Indicators sharing a Group association with the given Victim, use a query in the following format:
GET /v2/victims/{victimId}/indicators
For example, the query below will retrieve all of the Indicators associated with the Victim with ID 12345:
GET /v2/victims/12345/indicators
JSON Response:
{
  "status": "Success",
  "data": {
    "resultCount": 1,
    "indicator": [
      {
        "id": "54321",
        "ownerName": "Example Organization",
        "type": "Address",
        "dateAdded": "2016-07-13T17:50:17",
        "lastModified": "2017-05-01T21:32:54Z",
        "rating": 3.0,
        "confidence": 55,
        "threatAssessRating": 3.0,
        "threatAssessConfidence": 55.0,
        "threatAssessScore": 408,
        "calScore": 426,
        "calIndicatorStatus": 1,
        "webLink": "https://app.threatconnect.com/auth/indicators/details/address.xhtml?address=0.0.0.0&owner=Example+Organization",
        "summary": "0.0.0.0"
      }
    ]
  }
}
You can also find associated Indicators of a given type using the following format:
GET /v2/victims/{victimId}/indicators/{associatedIndicatorType}
For example, you could use the following query to find all Address Indicators associated with the Victim with ID 12345:
GET /v2/victims/12345/indicators/addresses
Retrieve a Victim’s Assets
To view Victim Assets associated with a given Victim, use a query in the following format:
GET /v2/victims/{victimId}/victimAssets
For example, the query below will retrieve all of the Victim Assets associated with the Victim with ID 12345:
GET /v2/victims/12345/victimAssets
JSON Response:
{
  "status": "Success",
  "data": {
    "resultCount": 2,
    "victimAsset": [
      {
        "id": "54321",
        "name": "bad@badguys.com",
        "type": "EmailAddress",
        "webLink": "https://app.threatconnect.com/auth/victim/victim.xhtml?victim=123"
      },
      {
        "id": "54322",
        "name": "nobody@gmail.com",
        "type": "EmailAddress",
        "webLink": "https://app.threatconnect.com/auth/victim/victim.xhtml?victim=123"
      }
    ]
  }
}
You can also find associated Victim Assets of a given type using the following format:
GET /v2/victims/{victimId}/victimAssets/{victimAssetType}
The available Victim Asset types are:
emailAddressesnetworkAccountsphoneNumberssocialNetworkswebSites
For example, you could use the following query to find all Victim Assets that are Email Addresses which are associated with the Victim with ID 12345:
GET /v2/victims/12345/victimAssets/emailAddresses
You can delve further by adding the ID of an associated Victim Asset to the end of the query:
GET /v2/victims/12345/victimAssets/emailAddresses/54321
Where 54321 is the ID of a Victim Asset associated with Victim 12345.
Victim to Victim Associations
Note
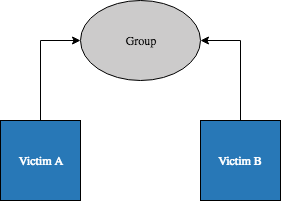
It is not possible to associate one Victim directly with another in ThreatConnect. The query described in this section returns Victims which are associated with (or ‘through’) the same Group(s). In the image below, the two Victims are not directly associated, but are both associated with the same Group. Therefore, Victim B would be returned when querying for Victim associations from Victim A.
To view Victims sharing a Group association with the given Victim, use a query in the following format:
GET /v2/victims/{victimId}/victims
For example, the query below will retrieve all of the Victims associated with the Victim with ID 12345:
GET /v2/victims/12345/victims
JSON Response:
{
  "status": "Success",
  "data": {
    "resultCount": 1,
    "victim": [
      {
        "id": "54321",
        "name": "Bad Guy",
        "org": "Example Organization",
        "suborg": "",
        "workLocation": "",
        "nationality": "",
        "webLink": "https://app.threatconnect.com/auth/victim/victim.xhtml?victim=54321"
      }
    ]
  }
}
You can delve further by adding the ID of an associated Victim to the end of the query:
GET /v2/victims/12345/victims/54321
Where 54321 is the ID of a Victim associated with Victim 12345.
Create Victims
The most basic format used to create a Victim is:
POST /v2/victims/
Content-type: application/json; charset=utf-8

{
  // add fields here...
}
When creating a Victim, you can also add any of the fields listed below:
Valid Fields |
Required |
|---|---|
name |
TRUE |
description |
FALSE |
org |
FALSE |
suborg |
FALSE |
workLocation |
FALSE |
nationality |
FALSE |
For example, the query below will create a Victim in the default owner:
POST /v2/victims/
Content-type: application/json; charset=utf-8

{
  "name": "Example Victim",
  "description": "This victim got hacked.",
  "org": "Test Org",
  "suborg": "HR Department",
  "workLocation": "Washington D.C.",
  "nationality": "American"
}
JSON Response:
{
  "status": "Success",
  "data": {
    "victim": {
      "id": "54321",
      "name": "Example Victim",
      "description": "This victim got hacked.",
      "org": "Test Org",
      "suborg": "HR Department",
      "workLocation": "Washington D.C.",
      "nationality": "American",
      "webLink": "https://app.threatconnect.com/auth/victim/victim.xhtml?victim=54321"
    }
  }
}
Create Victim Assets
To create Victim Assets, use a query in the following format:
POST /v2/victims/{victimId}/victimAssets/{victimAssetType}
Content-type: application/json; charset=utf-8

{
  // add fields here...
}
The available Victim Asset types are:
emailAddressesnetworkAccountsphoneNumberssocialNetworkswebSites
When creating a Victim Asset, there are certain fields that are required, as detailed below:
Asset Type |
Valid Fields |
Required for Asset Creation |
Required for Asset Update |
|---|---|---|---|
emailAddresses |
address |
TRUE |
TRUE |
addressType |
FALSE |
FALSE |
|
networkAccounts |
account |
TRUE |
TRUE |
network |
FALSE |
FALSE |
|
phoneNumbers |
phoneType |
TRUE |
TRUE |
socialNetworks |
account |
TRUE |
TRUE |
network |
FALSE |
FALSE |
|
webSites |
webSite |
TRUE |
TRUE |
For example, if you want to add a network account Victim Asset to a Victim with ID 12345, you would use the following query:
POST /v2/victims/12345/victimAssets/networkAccounts
Content-type: application/json; charset=utf-8

{
  "account": "John Doe",
  "network": "Active Directory"
}
In the case of networkAccounts or socialNetworks, the account specifies the value of the actual account, and the network provides a classification for the network itself.
JSON Response:
{
  "status": "Success",
  "data": {
    "victimNetworkAccount": {
      "id": 398,
      "type": "NetworkAccount",
      "webLink": "https://app.threatconnect.com/auth/victim/victim.xhtml?victim=12345",
      "account": "John Doe",
      "network": "Active Directory"
    }
  }
}
Create Victim Metadata
Create Victim Attributes
To add an Attribute to a Victim, use the following format:
POST /v2/victims/{victimId}/attributes
Content-type: application/json; charset=utf-8

{
  "type" : {attributeType},
  "value" : "Test Attribute",
  "displayed" : true
}
For example, if you want to add a Description Attribute to the Victim with ID 12345, you would use the following query:
POST /v2/victims/12345/attributes
Content-type: application/json; charset=utf-8

{
  "type" : "Description",
  "value" : "Test Description",
  "displayed" : true
}
JSON Response:
{
  "status": "Success",
  "data": {
    "attribute": {
      "id": "54321",
      "type": "Description",
      "dateAdded": "2017-07-13T17:50:17",
      "lastModified": "2017-07-13T17:50:17",
      "displayed": true,
      "value": "Test Description"
    }
  }
}
To add a Security Label to an Attribute, use the following format, where {securityLabel} is replaced with the name of a Security Label that already exists in the Owner:
POST /v2/victims/{victimId}/attributes/{attributeId}/securityLabels/{securityLabel}
For example, the query below will add a TLP:AMBER Security Label to the Attribute on the Victim:
POST /v2/victims/12345/attributes/54321/securityLabels/TLP%3AAMBER
Note
In order to add a Security Label to an Attribute, the Security Label must already exist. The query above will not create a new Security Label. If you specify a Security Label that does not exist, it will return an error.
Create Victim Security Labels
To add a Security Label to a Victim, use the following format, where {securityLabel} is replaced with the name of a Security Label that already exists in the Owner:
POST /v2/victims/{victimId}/securityLabels/{securityLabel}
For example, the query below will add a TLP:AMBER Security Label to the Victim with ID 12345:
POST /v2/victims/12345/securityLabels/TLP%3AAMBER
JSON Response:
{
  "status": "Success"
}
Note
In order to add a Security Label to a Victim, the Security Label must already exist. The query above will not create a new Security Label. If you specify a Security Label that does not exist, it will return an error.
Create Victim Associations
Associate Group to Victim
To associate a Victim with a Group, use a query in the following format:
POST /v2/victims/{victimId}/groups/{associatedGroupType}/{associatedGroupId}
Replace {associatedGroupType} with one of the following Group types:
adversariesattackPatternscampaignscoursesOfActiondocumentsemailseventsincidentsintrusionSetsmalwarereportssignaturestacticsthreatstoolsvulnerabilities
For example, the query below will associate a Victim with ID 12345 with an Incident with the ID 54321:
POST /v2/victims/12345/groups/incidents/54321
JSON Response:
{
  "status": "Success"
}
Warning
In order to associate a Victim with any item, that Victim must have at least one Victim Asset.
Update Victims
The basic format used to update a Victim is:
PUT /v2/victims/{victimId}
{
{updatedField}: {updatedValue}
}
When updating a Victim, you can change any of the fields below in addition to the required name field:
Valid Fields |
Required |
|---|---|
name |
TRUE |
description |
FALSE |
org |
FALSE |
suborg |
FALSE |
workLocation |
FALSE |
nationality |
FALSE |
For example, the query below will update the name of a Victim with ID 12345:
PUT /v2/victims/12345
{
"name": "New Victim Name"
}
JSON Response:
{
"status": "Success",
"data": {
"victim": {
"id": 54321,
"name": "New Victim Name",
"webLink": "https://app.threatconnect.com/auth/victim/victim.xhtml?victim=54321"
}
}
}
Update Victim Assets
To update a Victim’s Assets, use a query in the following format:
PUT /v2/victims/{victimId}/victimAssets/{victimAssetType}/{victimAssetId}
{
// add fields here...
}
The available Victim Asset types are:
emailAddressesnetworkAccountsphoneNumberssocialNetworkswebSites
When updating a Victim Asset, there are certain fields that are required, as detailed below:
Asset Type |
Valid Fields |
Required for Asset Creation |
Required for Asset Update |
|---|---|---|---|
emailAddresses |
address |
TRUE |
TRUE |
addressType |
FALSE |
FALSE |
|
networkAccounts |
account |
TRUE |
TRUE |
network |
FALSE |
FALSE |
|
phoneNumbers |
phoneType |
TRUE |
TRUE |
socialNetworks |
account |
TRUE |
TRUE |
network |
FALSE |
FALSE |
|
webSites |
webSite |
TRUE |
TRUE |
For example, if you want to update an existing network account Victim Asset on a Victim with ID 12345, you would use the following query:
PUT /v2/victims/12345/victimAssets/networkAccounts
{
"account": "Jane Doe"
}
JSON Response:
{
"status": "Success",
"data": {
"victimNetworkAccount": {
"id": 398,
"type": "NetworkAccount",
"webLink": "https://sandbox.threatconnect.com/auth/victim/victim.xhtml?victim=12345",
"account": "Jane Doe",
"network": "Active Directory"
}
}
}
Update Victim Metadata
Update Victim Attributes
To update a Victim’s Attribute, use the following format:
PUT /v2/victims/{victimId}/attributes/{attributeId}
{
{updatedField}: {updatedValue}
}
When updating Attributes, you can change the following fields:
Updatable Attribute Fields |
Required |
|---|---|
value |
TRUE |
displayed |
FALSE |
source |
FALSE |
For example, if you want to update the value of an Attribute with ID 54321 on the Victim with ID 12345, you would use the following query:
PUT /v2/victims/12345/attributes/54321
{
"value": "New attribute value."
}
JSON Response:
{
"status": "Success",
"data": {
"attribute": {
"id": "54321",
"type": "Description",
"dateAdded": "2017-07-13T17:50:17",
"lastModified": "2017-07-19T15:54:12Z",
"displayed": true,
"value": "New attribute value."
}
}
}
Delete Victims
The most basic format used to delete a Victim is:
DELETE /v2/victims/{victimId}
For example, the query below will delete the Victim with ID 12345:
DELETE /v2/victims/12345
JSON Response:
{
  "status": "Success"
}
Delete Victim Assets
To delete a Victim’s Asset, use a query in the following format:
DELETE /v2/victims/{victimId}/victimAssets/{victimAssetType}/{victimAssetId}
For example, the query below will delete the email address Victim Asset with ID 54321 from the Victim with ID 12345:
DELETE /v2/victims/12345/victimAssets/emailAddresses/54321
JSON Response:
{
    "status": "Success"
}
Delete Victim Metadata
Delete Victim Attributes
To delete an Attribute from a Victim, use the following format:
DELETE /v2/victims/{victimId}/attributes/{attributeId}
For example, if you want to delete the Attribute with ID 54321 from the Victim with ID 12345, you would use the following query:
DELETE /v2/victims/12345/attributes/54321
JSON Response:
{
  "status": "Success"
}
To delete a Security Label from an Attribute, use the following format, where {securityLabel} is replaced with the name of a Security Label that already exists in the Owner:
DELETE /v2/victims/{victimId}/attributes/{attributeId}/securityLabels/{securityLabel}
For example, the query below will remove the TLP:AMBER Security Label from the Attribute with ID 54321 on the Victim:
DELETE /v2/victims/12345/attributes/54321/securityLabels/TLP%3AAMBER
Delete Victim Security Labels
To delete a Security Label from a Victim, use the following format, where {securityLabel} is replaced with the name of a Security Label:
DELETE /v2/victims/{victimId}/securityLabels/{securityLabel}
For example, the query below will delete the TLP:AMBER Security Label to the Victim with ID 12345:
DELETE /v2/victims/12345/securityLabels/TLP%3AAMBER
JSON Response:
{
  "status": "Success"
}
Delete/Disassociate Victim Associations
Disassociate Group from Victim
To disassociate a Victim from a Group, use a query in the following format:
DELETE /v2/victims/{victimId}/groups/{associatedGroupType}/{associatedGroupId}
Replace {associatedGroupType} with one of the following Group types:
adversariesattackPatternscampaignscoursesOfActiondocumentsemailseventsincidentsintrusionSetsmalwarereportssignaturestacticsthreatstoolsvulnerabilities
For example, the query below will disassociate a Victim with ID 12345 from an Incident with the ID 54321:
DELETE /v2/victims/12345/groups/incidents/54321
JSON Response:
{
  "status": "Success"
}